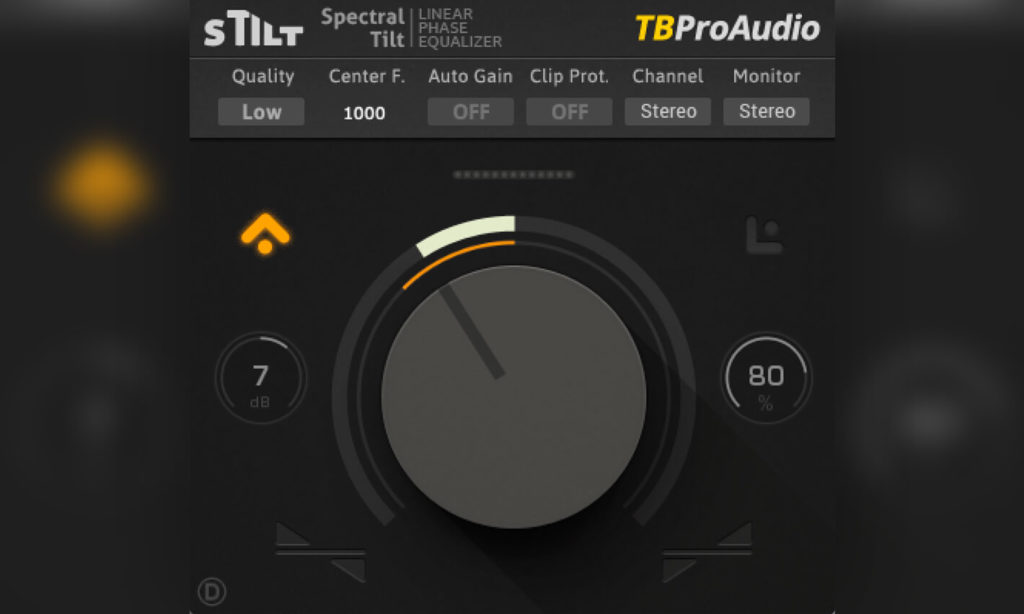
sTilt by TBProAudio is a free filter you can use to tilt the frequency balance of your source towards the low or high-end. This effect is achieved by boosting everything below and cutting everything above a given center frequency (or vice versa). To find out further details about this plugin and why tilt filters can be useful in the first place check out the full review below.
Advantages of Tilt EQs
The big advantage of tilt filters towards a common EQs lies in their simplicity. You only have one (main) parameter, so you can slap the effect on your track, adjust it in the blink of an eye and move on. Obviously you can’t use them to make precise adjustments, but if you just want to change the overall tonality of your source sound they do a pretty great good.
In some cases tilt EQs might even sound more natural than plain shelf filters for example.
Main Section
Taking a look at sTilt’s GUI you’ll quickly notice that it’s centered around one big knob, controlling the filter’s slope. Turning it to down warms up the sound while turning it to the opposite direction brightens it up. Here’s what the remaining parameters do:
Output Gain - On the left side of the main knob you can dial in the output gain, which is useful to make up for unwanted volume changes. This is also a must for accurate A/B comparisons.
Dry / Wet - On the right side of the main knob you’ll find a dry / wet control, which allows you to seamlessly mix in the unprocessed signal if you feel like you overdid it with the main knob.
Bypass - The arrow in the top-left corner of the main section acts as a bypass button.
Limited Spectrum - The last control of the main section is located in the top-right corner. If enabled, sTilt only cuts the signal, rather than boosting and cutting at the same time.
Additional Settings
On top of the main section, the GUI further includes a smaller area with 6 additional controls.
Quality - Determines the filter’s sound quality. You can choose between: Low, Eco, Medium, High & Max. Since it’s a linear phase filter “better” values will increase the plugin’s latency.
Center Frequency - This is the crossover frequency between the cutting and the boosting part of the filter. It’s ranging from 10 Hz - 22kHz, which is probably way more than enough 😉
Auto Gain - If enabled, sTilt will try to automatically make up for volume changes.
Clip Protection - Cuts everything above 0 dB. I’d recommend leaving it off. Instead, make sure that your mix has a few dBs of headroom and use the output gain control if needed.
Channel - Controls which part of the input signal is affected by the processing. You can choose between Stereo, Left, Right, Mid and Side.
Monitor - Controls which part of the output signal is actually hearable. Again you can choose between the Stereo, Left, Right, Mid and Side.
Recap
The sTilt filter does exactly what it’s supposed to do and is therefore a great tool for tonal adjustments. Although it’s easy and intuitive to use, the guys from TBProAudio also made sure to add some advanced settings. Since the plugin is also free to download, plus works on Mac & Windows I’d highly recommend to check it out!


